 The Calçot season has arrived (pronounced calsot) and those who don’t know what I’m talking about are in for a mouth-watering and extremely fun surprise! Calçots are a typical dish from the Catalonia region of Tarragona, specifically from the town of Valls however their popularity is spreading all over Spain and is also common in the Valencia rural region. If you have never experienced a “Calçotada”, the name given to the entire lunch ceremony you will now have a new excuse for inviting your friends over, as this is a dish that should be enjoyed in numbers as it can get very messy and first-timers beware, Calçots leave their ‘mark’ in every sense of the word! There is a saying in Catalan that clearly defines the best time to eat Calçots:
“ In January for the peasant farmers, In February for the Master and in March for the servants” so we are clearly entering the right month for trying this fantastic dish.
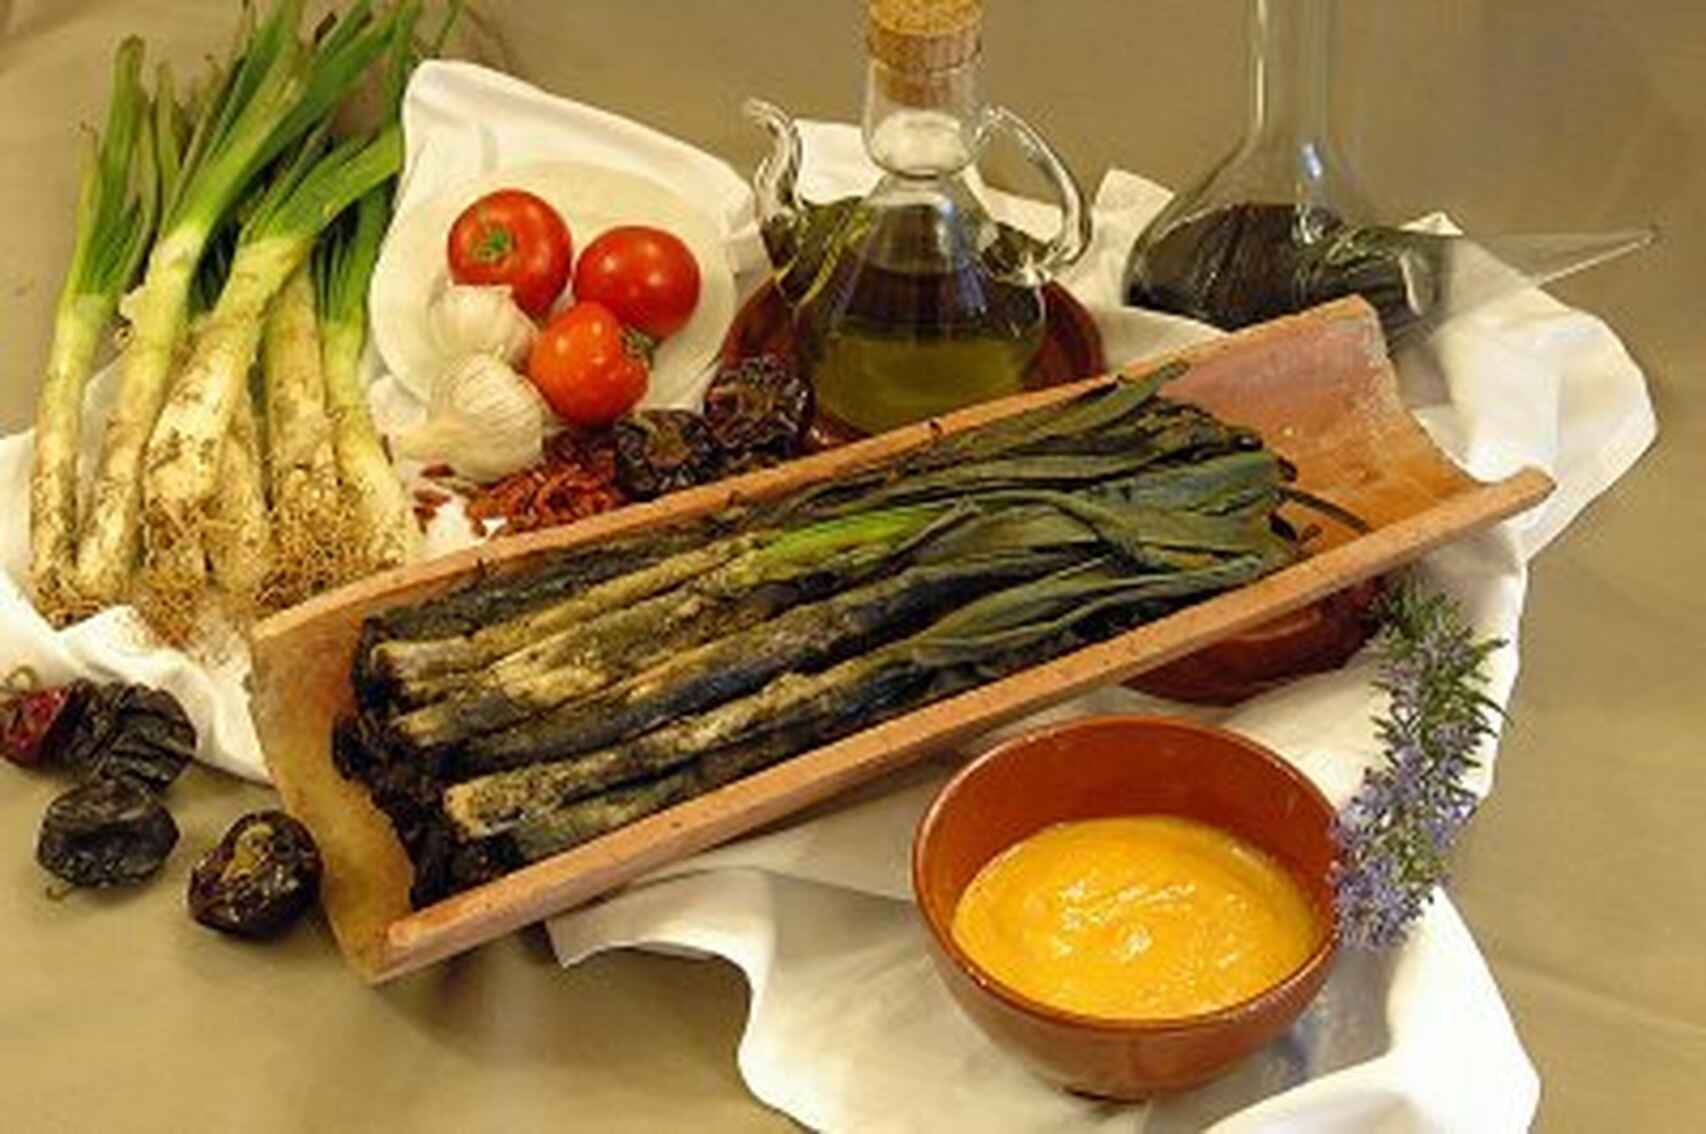
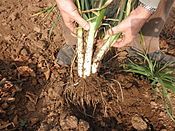
So what exactly am I talking about? Calçots are a type of onion, something between a spring onion and a leeK, with no bulb. The origin of the variety is disputed, but the most commonly accepted version of its history is that they were developed by Xat de Benaiges, a peasant farmer from Valls at the turn of the 20th century. He is said to have been the first to plant the sprouts of garden onions, covering them with earth so a longer portion of the stems remained white and edible. This technique is known Catalan as calçar, a Catalan agricultural term which means to cover the trunk of a plant or vegetable with soil. As the plant grows, soil is continuously added and replanted until it reaches a certain length, hence the name calçot.
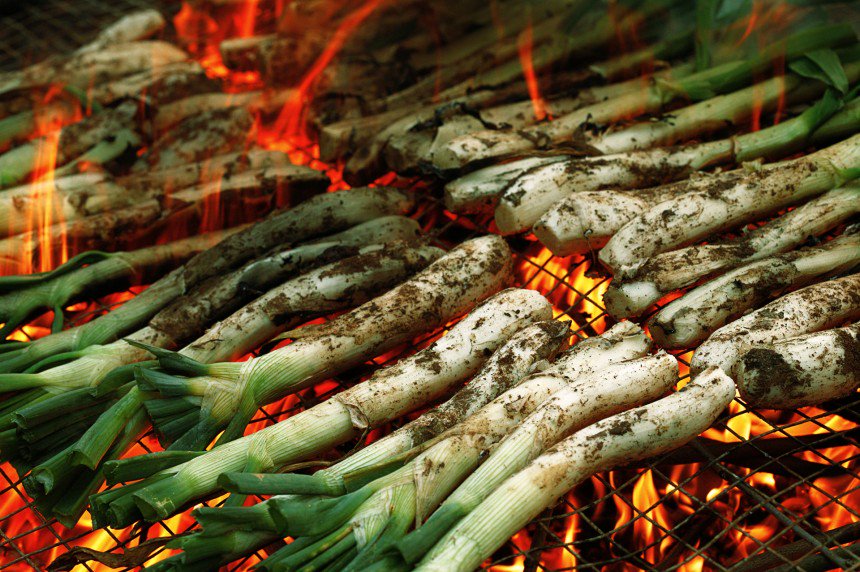
 The Calçots are chargrilled on an open wood fire or a barbecue with a high flame. You can also cook them in the oven but the result is not the same. So I highly recommend this dish as a starter for a barbecue. It may not be ideal weather back home for a barbecue but in Spain, the weather right now isn’t too bad! ( At least in Valencia...today!) In Catalunya, this is a massive family event and many villages celebrate the season’s harvest by organising street barbecues for the inhabitants.
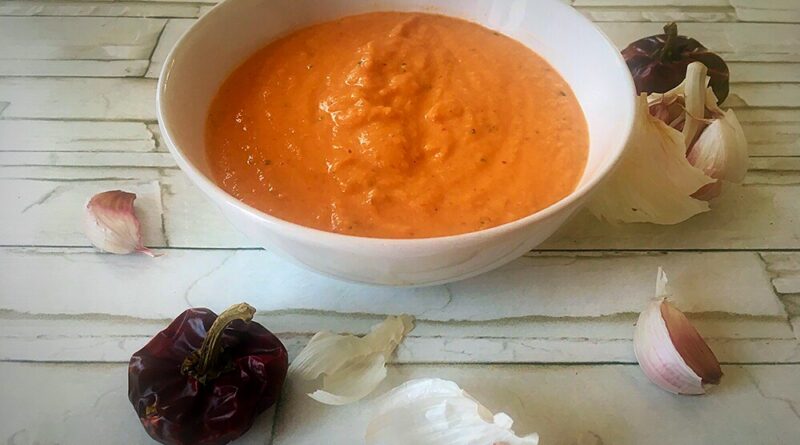
It symbolises the renewal of friendships as the entire event is carried out around a bonfire making for a long day of eating and talking. However, the most important part of this dish is the thick sauce that you dip the Calçots in called Salvitxada ó more commonly known as Romesco
Traditionally Calçots are served on a clay roof tile to keep them warm and are eaten standing up, once the Calçots are ready their outer skin will have hardened and turned black, totally charred. You hold the Calçot by the green leaves and remove with the other hand the charred outer skin, and the tender sweet white onion is revealed. This is dipped in the sauce and then raised up, leaning your head back, you lower the Calçot into your mouth.
It can get very messy as the sauce drips and your hands will go black, so be very careful not to scratch your nose! The first time I ended up pushing my hair out of my eyes, rubbing my eyes due to the smoke and I can assure you I wasn’t a pretty sight. I looked as if I had been down a mine all day! It is customary to wear a bib when eating Calçots, yes a bib, even the adults. If you ever go to a restaurant to eat Calçots you will automatically be given a bib and the day you try it you will almost certainly appreciate it!
.jpeg)
The star of this recipe is the sauce - Romesco - so I am going to share with you the traditional recipe. As with many Spanish recipes, there are slight changes depending on the region and then every family adds their special touch. The same thing happens with the Paella and Gazpacho and a number of other well-known dishes. However, this is the standard recipe the majority work with. Once again it is greatly dependant on olive oil and local Mediterranean ingredients, so it is very healthy and finger-licking delicious.
If you are a knife and fork person and a prisoner to creature comforts, this dish is not for you!
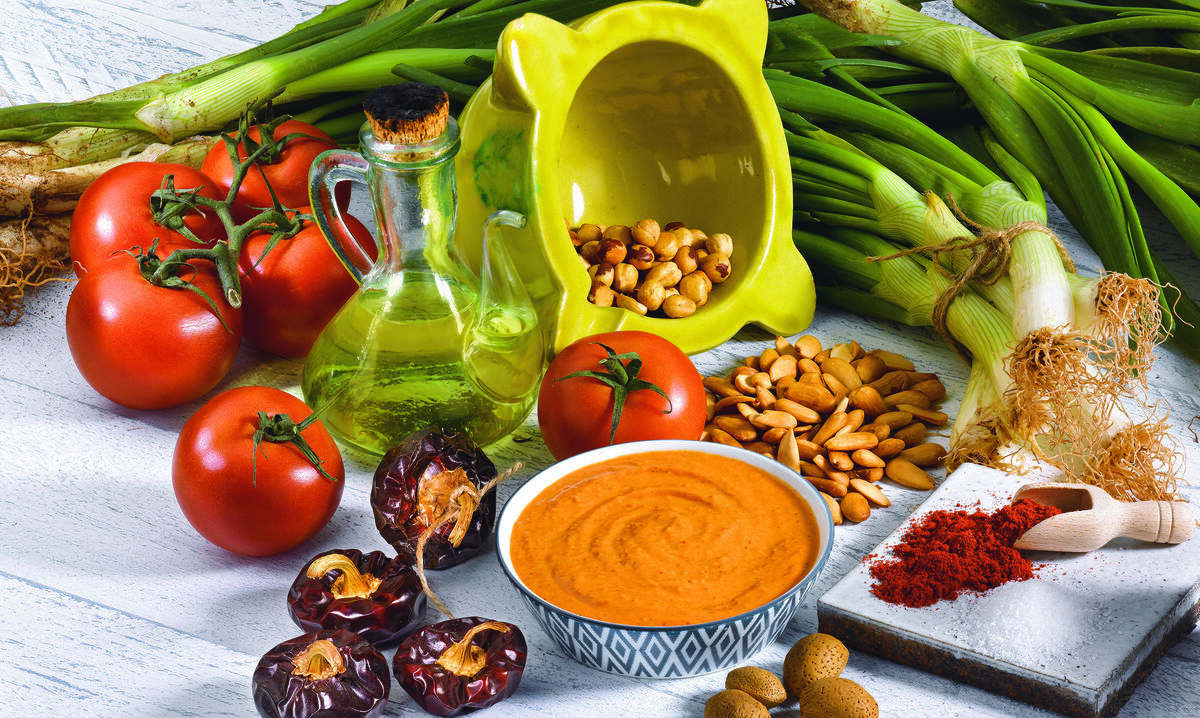
For the Claçot sauce this is what you will need:
· 150ml Aceite de Olive Extra virgin – Arbequina variety if possible
· 1 whole head of garlic unpeeled
· 100g of peeled almonds
· 100g of peeled hazelnuts
· 4 slices of one-day-old baguette bread
· 1 Ñora pepper or Choricero pepper
· 3 ripe tomatoes
· Wine vinegar
· Salt
· Pepper
· Paprika
If you made the Ali Oli the other day you can go and get out your pestle and mortar again! However, if you are in a rush you can use your blender with this recipe.
The first step is to soak the Ñora pepper in lukewarm water for at least 12 hours. So do this the night before, as they are sold sun-dried. The Ñora pepper is like a cherry red pepper in size and it is not hot but has a very distinct flavour.
.jpg)
They are not easy to find in the UK as they are typically from the Murcia region in Spain. If you can’t find one use a normal red pepper or a choricero pepper. Once the Ñora had swollen with the water remove it and scrape away the pulp from the skin and keep to one side. We only want to use the pulp, at first sight, you might think that there is hardly anything there and that it hasn't really rehydrated but it has, you'll be surprised how much pulp you manage to scrape off the tough skin. Make sure you discard the seeds.
If you are using a barbecue place the 4 tomatoes and the head of garlic on the barbecue covered in tin foil until they are cooked, the last 10 minutes leave them open so they can char slightly. The garlic will take slightly longer. The cloves will be soft inside when they are ready. You should slice the bottom of the head of garlic so the heat can penetrate more quickly and so you can also control when the cloves are ready. When ready remove them from the grill and peel the tomatoes and the garlic cloves and place to one side. If you are not using a barbecue you can grill them or use a hot plate grill to char them. The next step is to brown the almonds and the hazelnuts in a pan with a dash of olive oil, you can buy them already toasted. If you do, you can skip this stage. We don’t want them dark brown, just slightly golden. Remove the nuts from the pan and add a little more olive oil, place the stale bread slices in the pan and toast them slightly until they are golden brown too and then put them to one side. Now we have all our ingredients ready, we can start blending.
Initially, we will grind the nuts in the pestle and mortar, you can use a blender but we don’t want a powder so be careful not to blend them too finely. They need to be small but not so small as we can’t see them in the sauce. This will help give consistency to the sauce and help it stick to the Calçot. Then we add the peeled tomatoes and at least 3 cloves of grilled garlic along with a healthy dash of extra virgin olive oil. Blend slowly or manually using the pestle and mortar. The next step is to add the Ñora pulp and the fried bread. Break the bread up into little pieces and put it into the blender/mortar. Season the mixture with salt and black pepper, a dash of wine vinegar (white or red) and a small teaspoon of paprika. At this point you can add more cloves of garlic if you feel you would like it to be stronger in flavour, this is a personal question of taste, some like it very strong and even chuck in a raw clove of garlic to spice it up a little, I don’t think it is necessary. Finally, blend it all together in the blender or the mortar and slowly add extra virgin olive oil and extra vinegar if necessary to the mixture until you reach a thick consistency, taste and adjust, as you feel necessary. You may find you want a little more vinegar or little more salt, practice will make perfect. It should have a tangy, nutty flavour to it.
If you don’t have a barbecue you can char the Calçots over a gas flame until they turn black using a grill rack, then quickly wrap them totally in tinfoil and place them in the oven at 200ºC for about 10-15 minutes in an earthenware dish. If you weren’t able to barbecue the tomatoes or the garlic, grill them slightly until they have charred slightly and then place them in the oven until they soften along with Calçots.
Now you are ready to eat your Calçots, just slide off the outer skin, it comes away without any problems then dip the Calçot in the sauce and eat! No knives and forks here! It’s time to get messy! Don’t forget your bib!
If you don't manage to find any Calcots and still want to try this dish it also works well with grilled Bimba broccoli - on a griddle with a little salt and olive oil - you might want to steam them a little first to soften them up slightly.
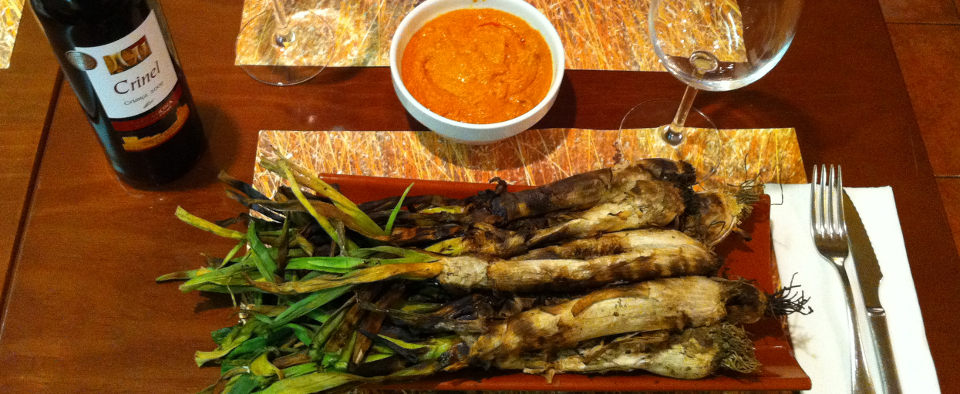
If you have decided to use a barbecue then the ceremony doesn’t end here, traditionally the meal would continue with chargrilled sausages and meats all washed down with Cava!
.jpeg)
Enjoy your next Calçotada!